
One of the widely used wireless routers, Airport Time Capsule, a product of Apple Inc., features network-attached storage (NAS) and the residential gateway router. It provides you with all the necessary and advanced wireless networking elements that are required to fulfill the major requirements of this digital world. That said, it is extremely crucial to ensure an appropriate Airport Time Capsule setup so that you can experience a hassle-free and smooth functioning of the wireless router. In this blog, we will discuss how you can setup Airport Time Capsule using some simple techniques and explore some aspects of the wireless router.
An Introduction To Your Time Capsule
Before you setup Time Capsule, it is recommended that you know about the use and locations of the various ports in it. There are five ports at the back of the Time Capsule:
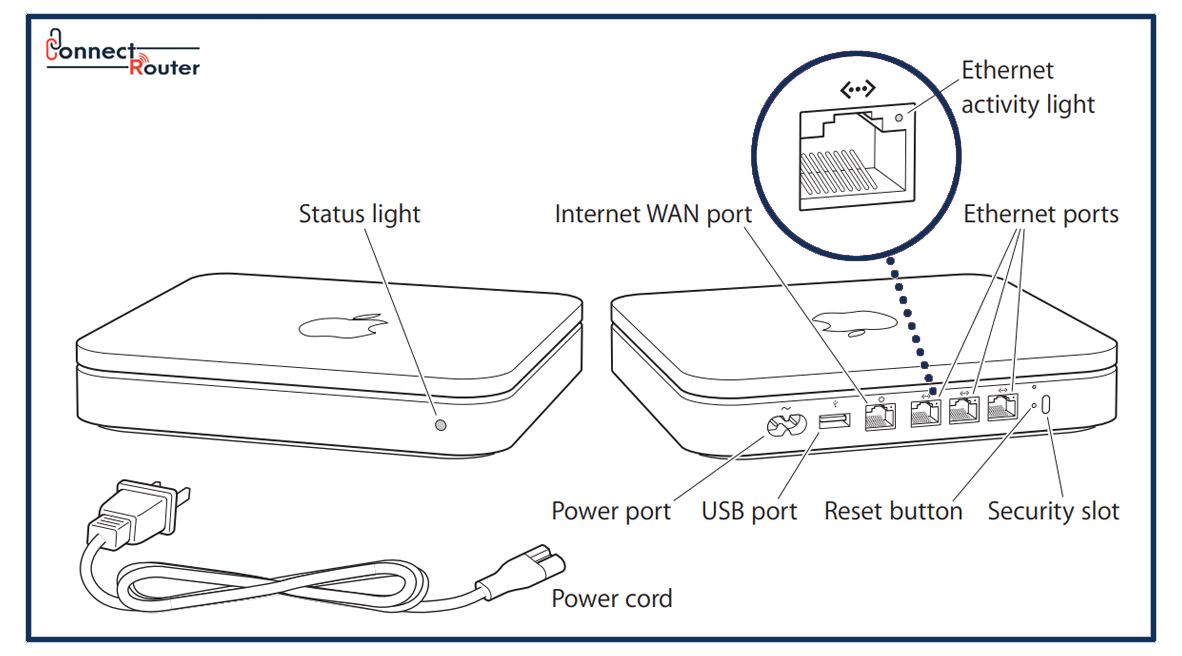
- One 10/100/1000Base-T Gigabit Ethernet WAN port: It helps you in connecting a DSL or cable modem.
- Three 10/100/1000Base-T Gigabit Ethernet LAN ports: It helps you in connecting various Ethernet-enabled devices like printers and computers to an existing Ethernet network.
- A USB port that allows you to connect a compatible USB printer, hard drive, or hub to connect multiple devices.
You can use the reset button next to these ports to troubleshoot the Time Capsule.
Basic Requirements For Airport Time Capsule Setup
Prior to performing the Apple airport time capsule setup, you must ensure that it meets certain requirements. These are:
- You have a working broadband modem with internet connectivity
- A DSL cable to setup Apple Airport Time Capsule and connect the Time Capsule to the modem
- A power socket for plugging the Time Capsule
- Mac or iOS device to perform the Airport Time Capsule setup
- To setup Airport Time Capsule, you can also use a Windows PC; however, it should have the Airport Utilities installed
Requirements of Time Capsule Setup for Mac OS
If you are using a Mac OS, ensure that you fulfill the following requirements for the Apple Time Capsule setup:
- Mac OS X v10.5.7 or later
- Airport Extreme card installed on a Mac computer
- Airport Utility v5.5.3 or later
Requirements of Time Capsule Setup For Windows OS
While setting up the Apple Time Capsule, a Windows OS requires you to fulfill the following:
- A computer installed with a 300 MHz or higher processor speed
- Compatible 802.11a, 802.11b, or 802.11g, IEEE 802.11n wireless card
- Windows Computer connected to the Time Capsule with an Ethernet cable
- Airport Utility v5.5.3 or later
Setting up your Time Capsule enable the following devices to access the wireless Airport network:
- Mac computers
- 11a, 802.11b, 802.11g, and IEEE 802.11n wireless-equipped computers
- WiFi-enabled devices such as iPad, iPhone, iPod Touch, and Apple TV
- Computers connected to your Time Capsule using Ethernet
In case you connect a USB-compatible printer to your Time Capsule, all the supported devices on the network can print to it.
Airport Time Capsule Setup | Time Capsule Setup Guide
You might wonder how to set up Time Capsule and connect it to the available WiFi-enabled devices. To start the Apple Airport Time Capsule setup, you should first connect the DSL cable by plugging one end to the internet modem and the other into the WAN port of the Airport Time Capsule. To continue with the setup Apple Airport Time Capsule, it is recommended that you plug in all the cables before plugging the power cable of the Time Capsule. Once you plug in the power cable to an electrical socket, switch on the router, and continue the process of Airport Time Capsule setup by following the below-mentioned steps:
- Once the router is powered on, the Apple Time Capsule will boot up, receive an IP address from the modem, and will set itself with a default configuration.
- To continue with the Apple Airport Extreme setup, open the Airport Utility application
- You will notice that the Airport Time Capsule is broadcasting, booted up, and set up with a default name.
- Select the Time Capsule, and click on “Continue”.
- Continue with the Apple Airport Express setup by locating the new Time Capsule on the list of available wireless networks; select it.
- Select ‘Create a new network’, and click on the ‘next’ option.
- Personalize the Time Capsule’s Base Station and the WiFi network.
- Enter the network name of your choice.
- Set a wireless network password and assign it to the Base Station.
- Now perform the Time Capsule setup existing WiFi network.
- Select next and follow the on-screen instructions to connect Time Capsule to WiFi, and complete the setup Airport Time Capsule.
You may also wonder how to connect Time Capsule to Mac without internet. With Apple Time Capsule, you can connect it via ethernet to the rest of the network using the WAN port on the router. This will ensure the availability of the network to your computer which can be connected to the network.
A New Wireless Network Creation
To create a new wireless network, you can use the Airport Utility assistant. It guides you through the necessary steps for naming your wireless network, protect it with a password, and set other options. If you want to share a USB printer or USB hard disk on your network, follow the below-mentioned instructions:
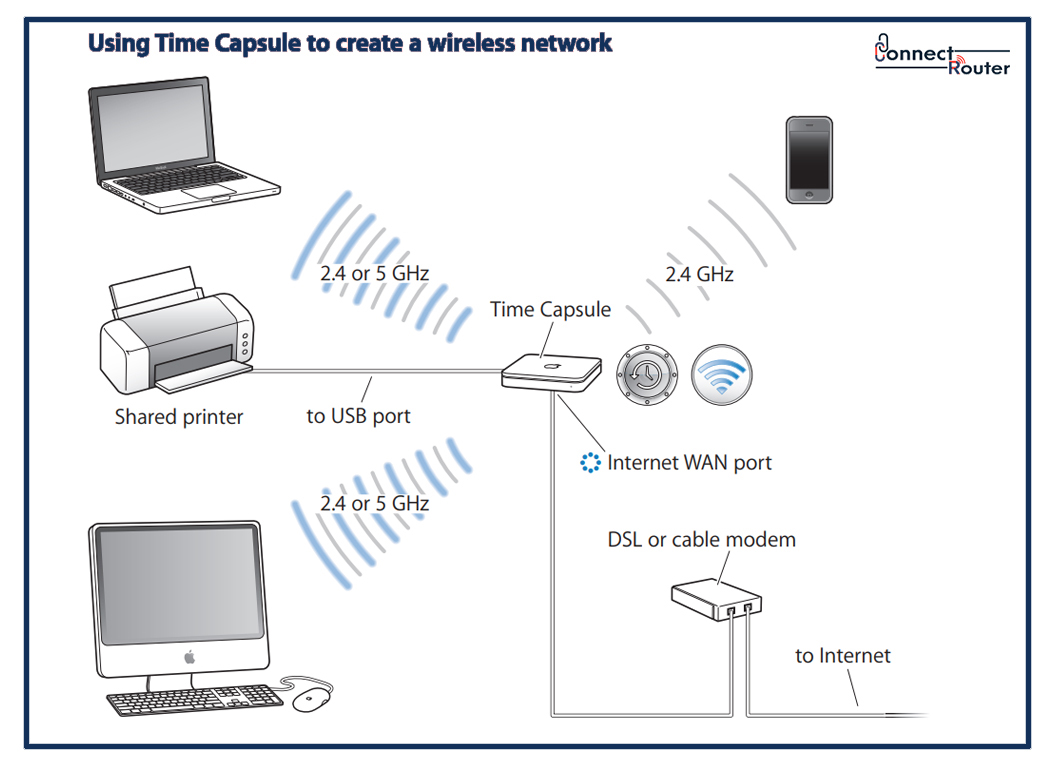
- Connect your USB Printer or the hard disk to the USB port of the Time Capsule.
- From the Utilities Folder, open Airport Utility.
- Click on your Time Capsule and then on Continue.
- Create a new network by following the on-screen instructions.
How To Use The Airport Utility In Mac?
You must use the setup assistant in Airport Utility to configure and setup your Time Capsule. Here’s what you need to do:
- From the Utilities folder, open Airport Utility.
- Click on Continue after selecting your Time Capsule.
- In case the Time Capsule is not visible, click on Rescan to scan for the available wireless devices, and then select your Time Capsule from the list.
- Follow the on-screen instructions to complete the Time Capsule setup.
How To Use The Airport Utility in Windows?
If you have the Windows OS, follow the below-mentioned steps to configure and set up the Time Capsule:
- Navigate to Start > All Programs > AirPort to open the Airport Utility.
- Select your Apple Time Capsule and click on Continue.
- In case the Airport Utility is not installed on your computer, you can download it by visiting www.apple.com/support/airport.
Various Status Lights Of Apple Capsule
Given below is the list of various status lights and their description during an Apple Time Capsule setup:
Light Status | Description |
| Off | Time Capsule power adapter not connected |
Stable Amber | Apple Capsule startup in progress |
Blinking Amber | Time Capsule cannot establish a network connection |
Stable Green | Your Apple Capsule is powered on and working fine |
| Blinking Amber and Green | Startup issue of the Time Capsule |
Stable Blue | The Time Capsule is set to allow wireless device access to the network |
How To Use A Time Machine With Your Time Capsule?
The Time Machine application in Mac OS X allows you to back up everything on your computer. Once you set up the Time Machine, the backup starts automatically on your computer. Using a Mac OS X v10.5.7 or later for the first time asks if you’d like to back up your files. In such cases, click on “Use as Backup Disk”. You can use the Time Machine pane of System Preferences to configure automatic backups or adjust other settings. Setting up or adjusting Time Machine on a Mac OS X Leopard or later version of computer requires you to perform the following actions:
- Click on the Apple menu > System Preferences, and then click on Time Machine.
- Use the Toggle key to switch it on.
- Click on Change Disk.
- Select your Time Capsule and click on “Use for Backup”.
Why Is My Time Capsule Not Showing Up In Airport Utility?
Instances may happen when you aren’t able to see the Time Capsule in Airport Utility. In such cases, power off the Time Capsule and shut down your Mac as well. Start the devices again and check whether the issue has been resolved or not.
It may also happen that after you locate the Time Capsule, it is asking for the Airport extreme default password. The default password for the device is the word “public”. This is a similar password which is required during the factory reset of the router.
How To Perform An Airport Extreme Setup?
Setting up an Airport Extreme requires you to perform the following actions:
- Switch on the Airport Extreme Base Station and launch the Airport Utility application.
- Click on the other Airport Base Station or other WiFi Devices on the top-left of your screen.
- From the list, click on the Airport Extreme option.
- Click on Next, and follow the on-screen instructions to complete the setup of your Airport Extreme.
Common Queries On Apple Airport Time Capsule Setup
- How do I setup my Apple Airport Time Capsule?
To setup Apple Airport Time Capsule, follow the steps mentioned below:
- Switch on the Airport Time Capsule and open Airport Utility on your computer.
- In case, the router power LED doesn’t stabilize, restart Airport Time Capsule.
- Click on Start and select All Programs.
- Click on Airport.
- Select your Airport Time Capsule and click on Continue.
- Follow the on-screen instructions to setup Airport Time Capsule and the wireless network.
- Does Time Capsule need to be connected to a router?
Yes, your Airport Time Capsule should be connected to a router or a modem through an Ethernet cable. This will ensure that you have internet connectivity on your device.
- Can I use Time Capsule just for backup?
Yes, you can use the Time Capsule for backup as well for general storage purposes; however, the device doesn’t back up the files which you keep on your backup disk. Moreover, the space available for Time machine backups gets reduced.
- What can you do with the Airport Time Capsule?
You can use the Apple Airport Time Capsule for several purposes, such as providing high-speed wireless connectivity for your Apple devices, backing up crucial files wirelessly, connecting wireless printers and meeting printing requirements wirelessly, etc.
- Can I use my Airport Time Capsule as a hard drive?
Yes, you can use the Airport Time Capsule as a hard drive for storing files.
- Why did Apple discontinue the Time Capsule?
Apple stopped working on the Time Capsule as well as the Apple Time Capsule 2TB since 2012 as they have assigned the engineers to develop other APple products.
- What is the best replacement for the Time Capsule?
A few of the alternatives to Airport Time Capsule are listed as under:
- Western Digital My Cloud EX2 Ultra
- Netgear ReadyNAS RN212
- QNAP TS-128. All
- Western Digital 4TB My Cloud
Airport Time Capsule is an excellent device that meets all your wireless networking and internet requirements. To ensure smooth functioning and experience a hassle-free online activity, you must ensure the correct setup of the device, including the Airport extreme setup. Follow the setup guide the exact way, as mentioned here, and kick start with a new journey of your online world.