
One of the leading brands in the wireless router industry, Netgear is delivering exceptional services to the end-users. Allowing all desktop computers, laptops, and smart devices to connect via the internet, Netgear Routers are increasingly being adopted by individuals and industries of every size. These routers work by broadcasting signals through a channel for communicating with various devices on the wired or wireless network. However, instances occur when a router nearby your room or building uses the same channel as yours. It can cause signal interference and recurrent connection issues. Such issues can hamper your or your employees’ work. Read on to explore how to change channel on Netgear Router and enable your devices to communicate with it, without any interference.
How to Change Channel on Netgear Router?
To change channel on Netgear Router, open an internet browser on your mobile phone or a laptop, first. Next, enter the router’s IP address, which is generally 192.168.1.1 on the browser’s address bar, and hit Enter. Once you can see the router login window, enter the Netgear Router login credentials and hit Enter. The default router login credentials are mentioned at the back or bottom of the Netgear Router. In case you have changed the router login username and password; however, you have lost or forgotten it, you need to reset Netgear router. After resetting, you can use the default login credentials to log in to the router management console, and change it.
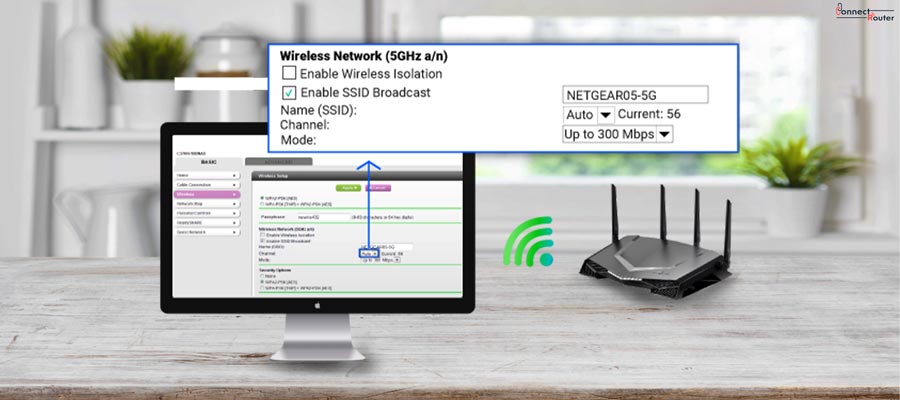
Once you log into the router management console, select the “Wireless” option. This will display the Wireless Settings page. Next, choose the region from the “Region” menu and number from the “Channel” menu for router channel settings. The best channel for Netgear Router will ensure hassle-free and smooth network connectivity. To change channel on Netgear Router, click on the “Apply” option at the bottom of the page. This will save the applied settings on your router and end the process of how to change channel on Netgear router.
An Insight into How to Change Channel on Netgear Router
If you need to change channel on Netgear Router, you must ensure that no online task is getting hampered during the process. You can postpone the router channel settings, if required. If you are ready, then you can start setting the best channel for Netgear Router. Here are some of the important insights into Netgear channel settings:
- Networking devices like Access Points, Routers, and Modems transmit signals and can interfere with each other. Ensure that you set them apart as far as possible so that they can use different channels.
- You can use channels 1 and 6 or channels 4 and 10. These are 5 channels apart from each other. Use a combination of access points, antennas, and other equipment for creating local spotlights of strong transmission. Simply by setting the best channel for Netgear Router does not eliminate the interference of signals. The two wireless protocols, 802.11b and g have three non-overlapping channels. In case, an area uses four or more channels, the interference level can drastically increase. Choose optimal channels for different networks.
- Set the router channel settings ensuring that they are at least five channels apart. It is recommended to use channels 1 and 8 and for the other, use 5 and 11. Ensure that you keep the routers and access points at a considerable distance from each other. The transmission of signals can be impacted due to physical barriers. Use directional antennas to ensure less signal interference. The network performance can deteriorate due to the interferences in the network.
- If you don’t know how to change channel on Netgear Router, and keep ignoring the clashing signals, it can cause network overhead. Your neighbor’s network device can automatically keep a record of the network name, whenever it is broadcasted. Besides, it can try to connect to your wireless network several times. Even if the connection cannot be established due to the network key, the performance of the router can significantly reduce. It is recommended to switch off the SSID broadcast and change the default SSID if a network is detected nearby. You can increase the network throughput by switching off the WEP and WPA security. In case, you are unable to access the internet via Netgear Router, disconnect the router and connect your laptop or the desktop computer directly to the modem. In case, that doesn’t work, you can update Netgear Router. Use the correct router login credentials to access the router management console. Select the Smart Wizard test option for accessing the Netgear online test page. Ensure that the router is assigned with a valid IP address and that the cables are connected to the router and the computer properly. If you are using a wired connection for the internet, check if the LEDs for the LAN ports are lit. If not, change the slot of the Ethernet cable on the router to a different one.
- Using a wireless device requires you to check if the wireless LED light on the router is lit. To ensure a maximum throughput and minimum interference of signals, you can choose channels 1,6, and 11. However, the nature of the other wireless networks determines the effectiveness of these channels. For instance, your wireless network is using channel 1 and another network is using 2, you must change channel on Netgear Router to channel 11. This will ensure the avoidance of signal interferences. Alternatively, you can use channel 6 for your router channel settings. The Netgear best channel for 5GHz band uses high frequency to offer free space in a network periphery and uses 23 non-overlapping 20MHz channels. With this, you have reached half of the process of changing channels on your Netgear Router.
- It is possible that your Netgear Router is already set on the best WiFi channel. Check the speed of the internet and check how many devices are connected to the wireless network. If you are using a Mac OS, tap and hold the Option key while tapping the WiFi icon on the menu bar to select the best WiFi channel. Once you see the Open Wireless Diagnostics option in the dropdown list, select it to open a dialog box. Tap on Next and navigate to the menu bar and select Window to scan for the network.
- Select the Scan Now option. Next, you will see a list of available wireless networks. In case, Netgear Router login pops up, use the proper username and password to access the router management console. For detailed information on the best channel for Netgear Router, you can scroll down through the Network page, and see the current channel and channel width.
- If you are a Windows user, you can visit WIndows Store to download an app called WiFiAnalyzer. Once you install the app on your computer, you can select the Analyze tab to view the channels and the graph. If you have Android devices, you can use the WiFi Analyzer for free.
- Using the WiFi Analyzer, you can identify WiFi dead spots in your wireless network area. Besides, it displays the Channel rating screen. It shows you the Netgear best channel for 5GHz Alternatively, you can use a Signal meter in WiFiAnalyzer for understanding the best location of your Netgear wireless router.
- The WiFi Analyzer Signal Meter allows you to detect the strong signal area while you walk around your room. It shows you the list of available access points or wireless networks. The AP list helps you in checking if your network is secured. By using the afore-mentioned methods, you can know about the best-fit WiFi channel for your Netgear Router, and ensure minimal interference.
- Apart from the apps mentioned above, you can use many others for Android or Mac devices which helps you in understanding the suitable WiFi channels for your Netgear Router.
- With 2.4 GHz WiFi, there are 13 different channels. However, this number varies according to the local regulations of a country. Although the WiFi with 2.4 GHz is slower, it can work significantly well with walls in between two devices. The 5 GHz WiFi is a bit faster than the 2.4 GHz WiFi; however, the signals cannot penetrate through walls. You can look out for many apps on Android and Mac devices for WiFi channels which help in switching to suitable channels for Netgear routers.
Netgear Routers offer you an excellent opportunity to connect all your computers and online devices to connect to the internet, and execute your work. While they play a crucial role in maintaining continuous network connectivity and fast internet, if too many routers are in the vicinity of your premises, issues may arise when similar channels interfere with each other and you will experience a drop in network performance. With the list of steps to change channels on your Netgear Router and the insights into the process, we hope that you can make the required changes on your router and experience a seamless network performance.