
Known for stable long-range connectivity, easy setup, and effortless management, TP-Link Routers are increasingly becoming the top choices of many internet users. Apart from providing high-speed internet and top-notch data security, TP Link port forwarding is one of the most effective features of the router that allows you to connect remote computers to a specific computer within a local area network (LAN). However, instances occur when you encounter issues like TP Link port forwarding not working.
To resolve this, you can follow some simple troubleshooting steps and ensure continued connectivity of your preferred computer systems within the LAN. Read on to explore how TP-Link port forwarding is done and how you can resolve if the feature is not working.
Port Forwarding On TP Link Routers
Before we discuss how to perform a port forwarding TP Link, let’s understand what TP Link Router port forwarding is. Port forwarding is a process that allows you to connect external devices such as computers to other computers in a private network or LAN. The process is executed by mapping an external port to an internal IP address and port. If you are into online gaming, you’d need to configure port forwarding on your home router for the gaming applications. An in-depth knowledge on TCP/IP port and the usage of ports and IP addresses would give you a clear understanding of TP Link port forwarding.
Now that you have a basic idea of TP-Link port forwarding, follow the below-mentioned steps to perform a port forwarding TP Link or get an answer to queries like how to do port forwarding in TP Link modem:
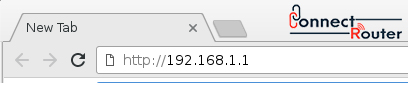
- Launch a web browser on your computer and browse the default router IP address – 192.168.1.1.
- Enter “admin” as the default username and password of the TP-Link Router.
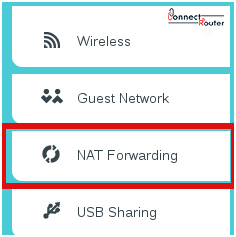
- Click on NAT Forwarding> Virtual Servers on the left hand panel, and then select “Add New”.

- Enter the Service port which you want to open and the computer’s IP address.
- Set the Protocol to TCP, UDP or ALL and change the Status to Enabled.
- Lastly, click on “Save” to save the settings.
Why Is My TP Link Port Forwarding Not Working and How to Fix It?
Instances like TP Link Archer C7 port forwarding or TP Link Archer C9 port forwarding are often a result of incorrect port forwarding settings on the router. You must ensure that the server is accessible from the local area network or the internal network. However, ensuring the correct Archer C7 default password is equally important.
Also, the TP Link port forwarding settings are different for different kinds of routers like DSL Modem Router, Wireless Router, 4G LTE Router, and Deco. Each service uses unique port numbers such as, for HTTP service, the recommended port number is 80. For FTP service, the port number is 21, for SMTP service, the port number is 25, and for POP3 services, the recommended port number is 110. Hence, you must ensure appropriate port numbers before making any changes to the TP-Link port forwarding settings.
In a nutshell, you will encounter TP Link port forwarding issues due to the following reasons:
- If you have incorrectly set the incoming interface. So, if your internet connection uses PPPoE, PPTP, or L2TP, you must ensure the selection of the correct connection type.
- You are using a firewall or third-party application for internet protection. You can temporarily disable this program and check if tp-link port forwarding or TP-Link port forwarding PS4 is working properly.
- Your internet service provider (ISP) is using a hidden NAT on their network. It might be the case that your ISP has provided you a public IP address that creates problems with another IP address. In such cases, TP-Link port forwarding for DVR or TP-Link port forwarding Minecraft won’t work properly.
Another important point is to ensure accurate WAN IP addresses. If your TP-Link port forwarding not working, you need to check the WAN IP address of the router and ensure that your TP-Link Router is assigned with a public IP address. In case the router has a private IP address, the port forwarding TP Link won’t work properly and you’d need to make changes to the router settings.
Common Queries on TP-Link Port Forwarding
- How do I port forward my TP Link Router?
Port forwarding on TP Link Router requires you to first log into the router using the default router IP address and the login credentials. Next, click on Forwarding > Virtual Servers and click on “Add New” followed by entering the Service Port, Internal port, and the IP address. Lastly, click on Save to save the changes.
- Is port triggering the same as port forwarding?
No, TP-Link port triggering allows you to use any computer on your private network, enabling you to use a single computer at a time; however, port forwarding can be done for only one computer.
- What is NAT and port forwarding?
Network Address Translation (NAT) allows you to translate traffic from one IP address to another; however, port forwarding works on the port level that enables you to connect remote computers to a specific computer in your local area network.
- How to resolve if I can’t port forward on router?
TP Link Router port forwarding issues can be resolved by ensuring the following pointers:
- Check if the TP-Link Router’s WAN is assigned with a public IP address.
- Ensure that you have the appropriate TCP/IP details on the client.
- Check if the correct ports are open on the client.
- Why are my ports not forwarding?
If you notice that the TP Link port forwarding not working, it means that the router’s WAN interface is assigned with a private IP address. Besides, issues related to TP Link Archer C7 port forwarding or TP Link Archer C9 port forwarding occur when the router is accessed from the local network.
- Can all routers port forward?
Yes, almost every router available in the market can be used for port forwarding.
- How do I know what port to forward?
Using a router for port forwarding requires you to have appropriate knowledge of the port numbers for various services. For example, HTTP service uses port number 80, SMTP service uses port number 25, and POP3 service uses port number 110.
- How to do a TP-Link Archer VR1600v port forwarding?
Port forwarding TP Link Archer VR1600v requires you to follow the below-mentioned steps:
- Log into the router using default router IP address, username, and password.
- On the router management console, select “Advanced”.
- From the left hand panel, select “NAT Forwarding” and then “Virtual Servers”.
- Lastly, click on “Add”, enter the required details, and select “Save”.
One of the essential features of TP-Link Routers, port forwarding requires you to ensure accurate TP-Link Router setup and port numbers for various services like SMTP, FTP, POP3, etc. In case you encounter any issues with TP Link router port forwarding, follow the listed methods in this article and ensure success of your port forwarding objective.